The Vlocity Build Tool is a Node.JS based command-line utility tool for exporting and deploying Vlocity aka SFI Metadata components from the source organization to target salesforce organization. It is completely different from Salesforce Metadata API Components. In this article I am going to show you how you can retrieve and successfully deploy Vlocity aka SFI Metadata components from one salesforce org to another salesforce org.
Installing the Vlocity_BuildTool
Before you start working with Vlocity Build Tool you will need Node.js, GitBash and SFDX CLI on your local machine.
Prerequisites for Using the Vlocity Migration Tool
As I mentioned above you should have Node.Js, Git, SFDX CLI Installed on your local machine. If you already have above tools on your computer, you don’t need to install them, so first verify the installation from a command prompt.
Node Js
Node version 10 or later is recommended for better security and for the latest TLS security protocols.
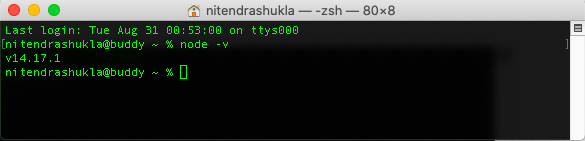
To check the version of Node Js that’s installed on your system:
Open a command prompt/terminal.
At the prompt, type node -v and press Enter.
If you have node version 10+, the output looks something like the following.
To install NodeJs, go to https://nodejs.org/ and get the latest version of the NodeJs. When you’re finished with the installation, verify by typing Node -v at a command prompt.
SFDX CLI
It is also a command line interface for working with salesforce orgs. Make sure you have the updated SFDX CLI in your local machine.
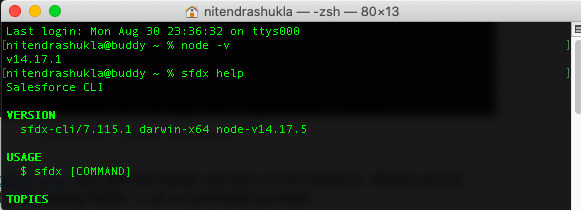
To install SFDX CLI, go to https://developer.salesforce.com/tools/sfdxcli and click on download button. When you’re finished with the installation, verify by typing sfdx help at a command prompt.
GIT CLI
Git is a version control tool and if you want to learn about it, I have curated an interesting article: https://sfdc247.com/2020/03/salesforce-release-management-and-version-control-branching-strategy.html please read it and it will certainly help you to understand git branching strategy.
To install Git CLI, go to https://git-scm.com/downloads and click on download button. When you’re finished with the installation, verify by typing git version at a command prompt

Vlocity Build
To work with Vlocity aka Salesforce SFI, you have to install Vlocity Build Package using the command npm install –global vlocity on your terminal/command prompt and it has been mentioned on this documentation https://github.com/vlocityinc/vlocity_build
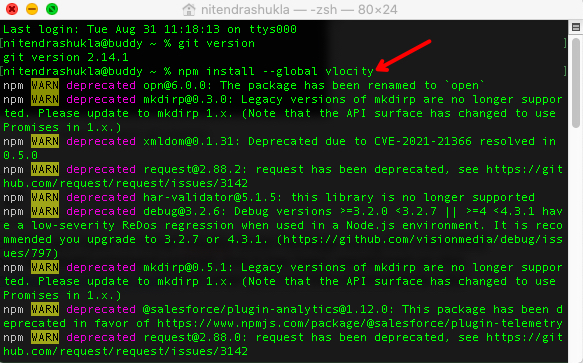
There are instances when you run vlocity help command you might not see Vlocity build version but you will see an error such as zsh: command not found: vlocity. In such cases run the same command as root user something like sudo npm install –global vlocity
Important information regarding Vlocity Build Installation
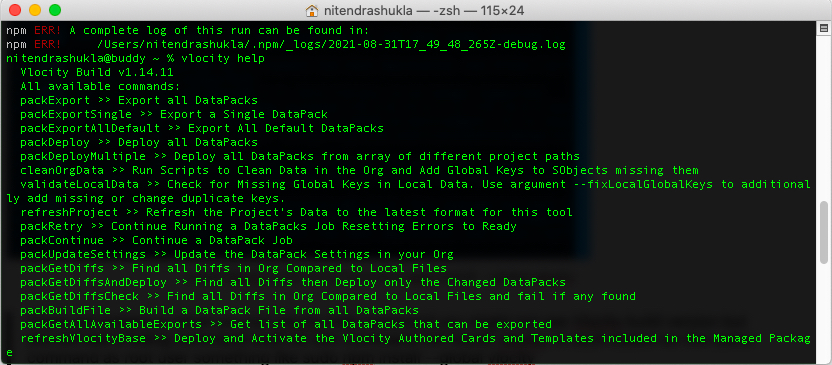
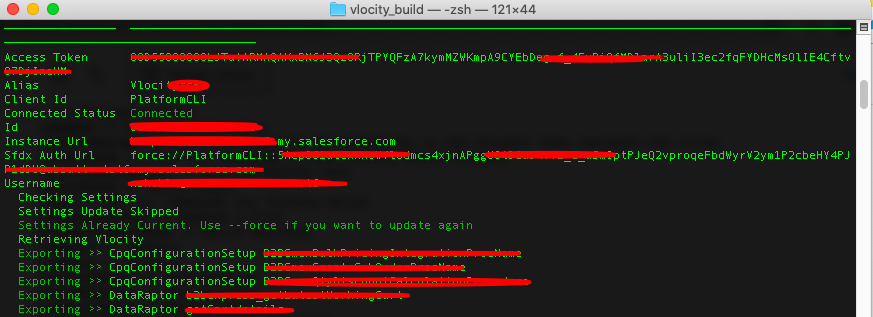
When you’re finished with the installation, verify by typing vlocity help at a command prompt, it will show you the list of commands supported by Vlocity and Build version.
Till this point we have understood what are the pre-requisites for installing Vlocity Build Tool. But, I have not discussed some points like ” your org should have vlocity package installed in order to retrieve or deploy ” components from one salesforce org to another. I am assuming that you are familiar with this approach.
How To Use Vlocity Build Tool
To use Vlocity Build Tool we need to configure our Salesforce org. To do that we need to create a directory within our system and a properties file that contains the Salesforce connection details.
Step 1: Create a directory/folder within Vlocity Build Folder.
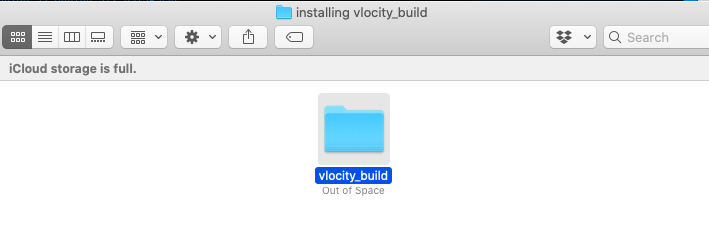
Step 2: Create a directory/folder within Vlocity Build Folder. For example I have created a folder named as SFDC247 VlocityBuildTool and have a build.properties file which have salesforce connection details.
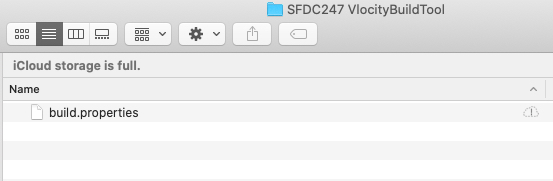
Build.Properties File for salesforce connection, you can create two build.properties file, one for source org and other for target org.
# build.properties
#

# Specify the login credentials for the desired Salesforce organization
sf.username = use your username
sf.password = password+securitytoken
#vlocity packExport -sf.accessToken <accessToken> -sf.instanceUrl <instanceUrl> -sf.sessionId <sessionId>

#sf.sessionId = <Insert your Salesforce session id here.  Use this or username/password above.  Cannot use both>
#sf.pkgName = <Insert comma separated package names to be retrieved>
#sf.zipFile = <Insert path of the zipfile to be retrieved>
#sf.metadataType = <Insert metadata type name for which listMetadata or bulkRetrieve operations are to be performed>

# Use 'https://login.salesforce.com' for production or developer edition (the default if not specified).
# Use 'https://test.salesforce.com for sandbox.
sf.serverurl = https://test.salesforce.com
#sf.serverurl = https://login.salesforce.com

sf.maxPoll = 20
# If your network requires an HTTP proxy, see http://ant.apache.org/manual/proxy.html for configuration.
#
If you don’t want to use build.properties you can also use SFDX CLI to authenticate salesforce environments.
//To connect salesforce orgs use below commands

sfdx force:auth:web:login -r https://test.salesforce.com -a sfdc247sandbox


sfdx force:auth:web:login -r https://login.salesforce.com -a sfdc247production

// once your orgs are connected use below commands to verify if they are connected or not

sfdx force:org:list
To this point I am assuming that your salesforce orgs are connected with your local machine onCloud and you are now ready to retrieve your salesforce vlocity components within your local folder. But, it is not easy as it sounds, since you will also need YAML file to export changes from your Vlocity org.
How To Retrieve Vlocity | Salesforce Industries Components
In order to retrieve Vlocity | Salesforce Industries Components you have to use below command in your command line interface.
//If you are using SFDX to export components
vlocity -sfdx.username usernameOfsalesforceOrg -job folderName/Example.yaml packExport

//If you are using properties file to export components
vlocity packExport -build.properties <filepath> -job <filepath>
Let’s break this command word by word and see what we learn.
vlocity – Every command of vlocity export starts with keyword vlocity
sfdx.username – It is the key but the value is defined in usernameOfsalesforceOrg, so you have to give your own username of an org, you can run sfdx force:org:list and pass username in the above command.
folderName/Example.yaml – Pass here the folderName and most importantly create your YAML File.
In Vlocity have two types of YAML Files, I cannot explain you everything on one single article, but I will explain you in two different examples.
Query Based Vlocity YAML File
You can t
//Query Based YAML FILE

projectPath: ./SFDC247
autoUpdateSettings: true

queries:
  - VlocityDataPackType: Product2
    query: Select Id from Product2 where vlocity_cmt__SpecificationType__c='SFDC247Product'      Or vlocity_cmt__SpecificationType__c='sfdc247'
  - CalculationMatrix
  - Promotion
maxDepth: -1
defaultMaxParallel: 10
exportPacksMaxSize: 10
useAllRelationships: false
Component Key Based YAML File
projectPath: ./SFDC247
IgnoreDependencies: false
manifest:
    - CpqConfigurationSetup/SFDC247Product
    - DataRaptor/B2BExpress_ExtractDocumentTemplateSFDC247
    - DataRaptor/b2bexpress_getSFDC247
    - DocumentTemplate/B2BExpressProposalSFDC247
    - IntegrationProcedure/update_SFDC247
    - OmniScript/b2bExpress_CreateQuote_SFDC247
    - VlocityUILayout/SampleAppCardSFDC247
It is usually easier and more efficient (reducing bloated yaml files) to use queries instead of stating each component by name, you can find the whole querydefinition in the vlocityBuilTool Git here: https://github.com/vlocityinc/vlocity_build/blob/master/lib/querydefinition.yaml
Query Defination File In VlocityBuild Tool
packExport – This command will export all the vlocity components mentioned on the YAML File. I will also give you the list of all available commands which will be useful if you want to explore more regarding vlocity commands.
List Of ALL Available Vlocity | Salesforce Industries Commands
  packExport >> Export all DataPacks
  packExportSingle >> Export a Single DataPack
  packExportAllDefault >> Export All Default DataPacks
  packDeploy >> Deploy all DataPacks
  packDeployMultiple >> Deploy all DataPacks from array of different project paths
  cleanOrgData >> Run Scripts to Clean Data in the Org and Add Global Keys to SObjects missing them
  validateLocalData >> Check for Missing Global Keys in Local Data. Use argument --fixLocalGlobalKeys to additionally add missing or change duplicate keys.
  refreshProject >> Refresh the Project's Data to the latest format for this tool
  packRetry >> Continue Running a DataPacks Job Resetting Errors to Ready
  packContinue >> Continue a DataPack Job
  packUpdateSettings >> Update the DataPack Settings in your Org
  packGetDiffs >> Find all Diffs in Org Compared to Local Files
  packGetDiffsAndDeploy >> Find all Diffs then Deploy only the Changed DataPacks
  packGetDiffsCheck >> Find all Diffs in Org Compared to Local Files and fail if any found
  packBuildFile >> Build a DataPack File from all DataPacks
  packGetAllAvailableExports >> Get list of all DataPacks that can be exported
  refreshVlocityBase >> Deploy and Activate the Vlocity Authored Cards and Templates included in the Managed Package
  installVlocityInitial >> Deploy and Activate all the initial Vlocity DataPacks included in the Managed Package
  runApex >> Run Anonymous Apex
  runJavaScript >> Run JavaScript on all DataPacks in the Project then recreate the files
  runTestJob >> Test all commands in the Vlocity Build Project
  runValidationTest >> Run validation test
  deltaCheck >> Delta Check
  help >> Get all commands for Vlocity Build
  packExpandFile >> Expand a File
  packBuildManifest >> Build Manifest
  compare >> Compare
  migrate >> Migrate
  revertChange >> RevertChange
  deltaMigrate >> DeltaMigrate
  getAvailable >> GetAvailable
  checkStaleObjects >> CheckStaleObjects
  retrieveSalesforce >> None
  deploySalesforce >> None
  runGitInit >> Initializes the git repo
  runGitCommit >> Commit the files
  runGitClone >> Clone the git repository
  runGitCheckoutBranch >> switch to a new branch
  runGitBranch >> get a list of branches
  runGitPush >> Pushes the changes to the git repo
  runGitCheckRepo >> check if the specific folder is a git repository
  runGitStatus >> Checks the status of tracked and untracked files in current directory
  refreshVlocityProcessListing >> Update Vlocity Process List
  downloadVplDatapack >> Download Vlocity Process Library DataPack
  downloadPerformanceData >>
  getOrgProjects >> Fetch Projects from org
  runTestProcedure >> Run Test Procedure
  runAllTestProcedures >> Run All Test Procedures
  getTestProcedures >> Get Test Procedures
  datapackOpen >> Open designer by DataPack Type and Name
  convertToCore >> Converts the Vlocity DataPack field names to new Salesforce mappings
So, to this point we have retrieved our components into the folder using the Pack Export command. Now you have to work on git to version control this entire export for push and pull. So, for we will need to go inside the folder and run git init command and then clone the repository using git clone “your repository URL”
How To Commit Vlocity Build Files To Git And Resolve Conflicts
I am not going to cover everything here but, will just give you a gist, the developers will retrieve changes in there local directory using git clone and will work on the specific branches and then the exported file which they have retrieved using pack export will be committed to git using below commands:
git add . : It will add contents of the file and you can use other commands along will it, its your choice.
git commit -m “Give Message” : Then you will commit these changes
git push : Then push these changes to remote repository.
You can also configure KDIFF3 or Use Tortoise Git to resolve conflicts when merging one branch to another branch. I have added a git branching strategy for Vlocity Build.
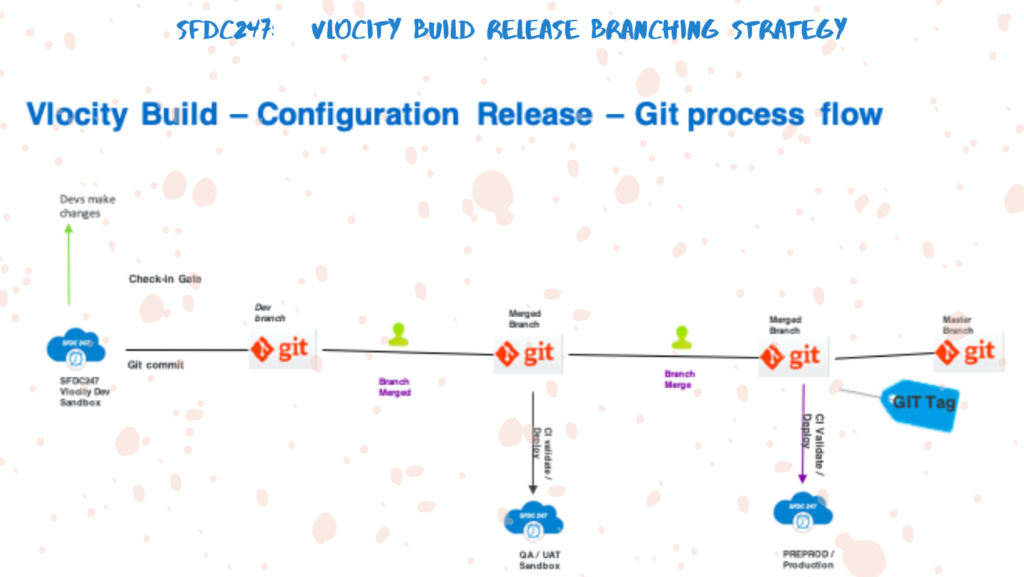
Deploying Changes To Target Salesforce Org
Once branches are merged successfully either you can configure CI-CD Pipeline in your remote repository which will build the file and deploy changes to target org. You can also use SFDX commands to validate and then deploy the changes to an org.
//Validation Command

sfdx force:source:deploy -c -u myuser@example.com  -x folderName/Example.yaml -w 10

//Deploy Command

sfdx force:source:deploy -u myuser@example.com  -x folderName/Example.yaml -w 10

#Note: You can run test classes if you are deploying to target org
To summarize, we have seen how we can work with Vlocity Build tool to retrieve and deploy Vlocity | Salesforce industries in your target org. If you want to understand more, you can always contact me using contact us page.
Note: It is always best practice to use VS Code Editor instead of using Terminal, it will increase your productivity of work.
Note: Publishing this content anywhere without the consent of SFDC247 will result in a lawsuit against copyright infringement
I have some questions about source driven deployment approach for vlocity components. How could I reach you?
I will assist you with answering any questions you might have in this comment.
Does anyone know what the vlocity assistant component is and how to use/configure it? Not the Vlocity Installation assistant, but the LWC that comes with the installed package.