MuleSoft provides a lightweight enterprise service bus (ESB) and integration framework called Mule. It is scalable and can be integrated with any legacy systems and since, the framework is built on a Java platform, the platform can interact with other platforms including web services and that is one of the main reasons why Salesforce bought Mulesoft.
I was working on one of the projects with Mulesoft using salesforce new feature which was released in winter 22 release known as Salesforce external services. In this article I will cover how to design/create your first Mulesoft API using Mulesoft API Designer and Integrate it with salesforce external service. Before going further I will first give you a brief about Mulesoft supports tools and Salesforce External Service and then we will discuss step by step on how we can integrate Mulesoft with Salesforce.
You can also read: Step By Step Guide On Getting Started With Vlocity Build Tool
What are different Mulesoft Supporting Tools
MuleSoft is an integration platform which integrates different tools using APIs. As Mulesoft developer, you will work on any platform. Mulesoft basically supports 5 different types tools mentioned below:
- Anypoint Studio: It is an Eclipse-based graphical interface for developing, testing, and running Mule flows.
- Anypoint Enterprise Security: It provides Mule applications with secure access and transactions.
- Mule Healthcare Toolkit: It provides processing of HL7 standard messages needed by healthcare organizations
- Mule Management Console: Mule Manager is a user interface that enables deployment to the Mule Repository and clusters at runtime.
- Mulesoft Cloudhub: It is an integration platform that connects apps, data, and devices with integration connectors. It is also known as Integration platform as a service (iPaaS) for building and deploying Mulesoft applications.
What is Salesforce External Service
Using salesforce external service you can integrate Salesforce orgs with external APIs without writing a single line of code. Also, you can create invocable actions in Salesforce and use them in a flow to interact with an external API source.
To learn more about salesforce external service you can follow the below links:
- Help Document: https://help.salesforce.com/s/articleView?id=sf.external_services.htm&type=5
- Trailhead Module On Salesforce External Service: https://trailhead.salesforce.com/en/content/learn/modules/external-services/get-started-with-external-services
So, basically we will import Mulesoft API build with API Designer with salesforce external services for Mulesoft. MuleSoft External Services can only be used with a MuleSoft license or trial account.
Salesforce Mulesoft Integration Flow Diagram
As you can see this flow diagram consists of four steps, but we will only discuss steps 1, 2, and 3. In my next article, I will discuss step 4 along with that we will also create a Mulesoft application and deploy it with Cloudhub.
How To Design Your First API Using Mulesoft API Designer
Using API specifications, developers can specify how APIs interact and integrate with the external API or system. RAML and OAS are 2 of the API specification languages used to describe and visualize how API interactions work. In this article, I will use API Designer to create a RAML specification that will be published to Mulesoft AppExchange.
Step 1: Setup A Free Trial Account With Mulesoft
As I mentioned above MuleSoft External Services can only be used with a MuleSoft license or trial account. In order to create your first API, we have to create a free trial account with Mulesoft using the below link.

Sign Up / Sign In
It’s the first step towards your new Mulesoft learning- sfdc247.
Step 2: Create Your API Using Design Centre
Once you are logged in to Anypoint Mulesoft Platform, Navigate to the Design Center by click on the Navigation menu on the upper left corner or you can also click on this link: https://anypoint.mulesoft.com/designcenter it will redirect you to design center project page. Once you have navigated to the Design Center, click the Create New button, and select Create API Specification as shown on the below video.
Created a video for your reference.
Code For Get Accounts Api – 1.0.0
#%RAML 1.0
types:
  Account:
    properties:
      FirstName:
        example: Example
        type: string
      LastName:
        example: Example
        type: string
      Email:
        example: Example
        type: string
      CompanyName:
        example: Example
        type: string
title: Get Account API
mediaType:
  - application/json
  - application/xml
version: "1"
protocols:
  - HTTP
  - HTTPS
/Account:
  get:
    responses:
      "200":
        body:
          application/json:
            type: Account
            example:
              strict: true
              value:
                FirstName: SFDC
                LastName: "247"
                Email: dummy@dummy.com
                CompanyName: SFDC247
          application/xml:
            type: object
How To Integrate Mulesoft AnyPoint Studio With Salesforce Using Mulesoft Connected App, Salesforce AuthProvider And Named Credentials
As I have mentioned above, we will be using a new feature known as “salesforce external services for mulesoft” to import anypoint studio platfrom API to salesforce. But, before doing that we have to make sure that connection between AnyPoint Studio and salesforce exists.
Step By Step Process Creating and Authenticating AnyPoint Studio Platform
- Login to Mulesoft AnyPoint Studio: In order to call and import Mulesoft API’s in salesforce we have to create a connected app. So, as a first step, please login to AnyPoint Studio using https://anypoint.mulesoft.com/login/ and then enter your username and password.
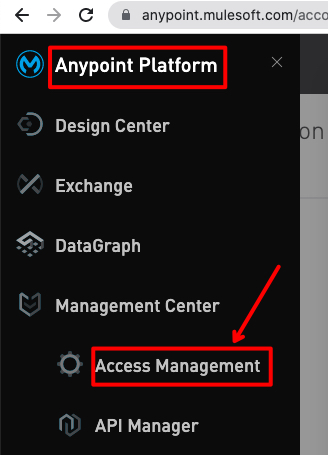
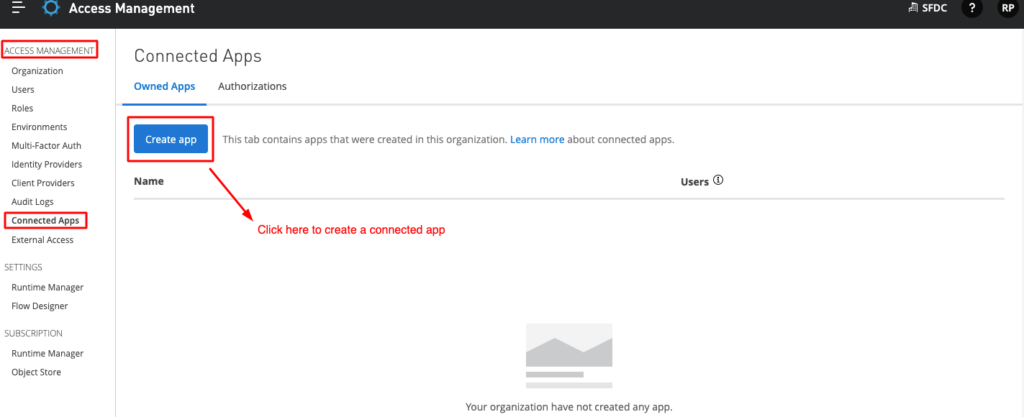
- Create Mulesoft Connected App: After logging in click on the navigation menu on the top left and then click on Access management. Scroll your cursor down and click on connected app and then click on create app button to create your first connected app in mulesoft. I have added screenshots for your reference.
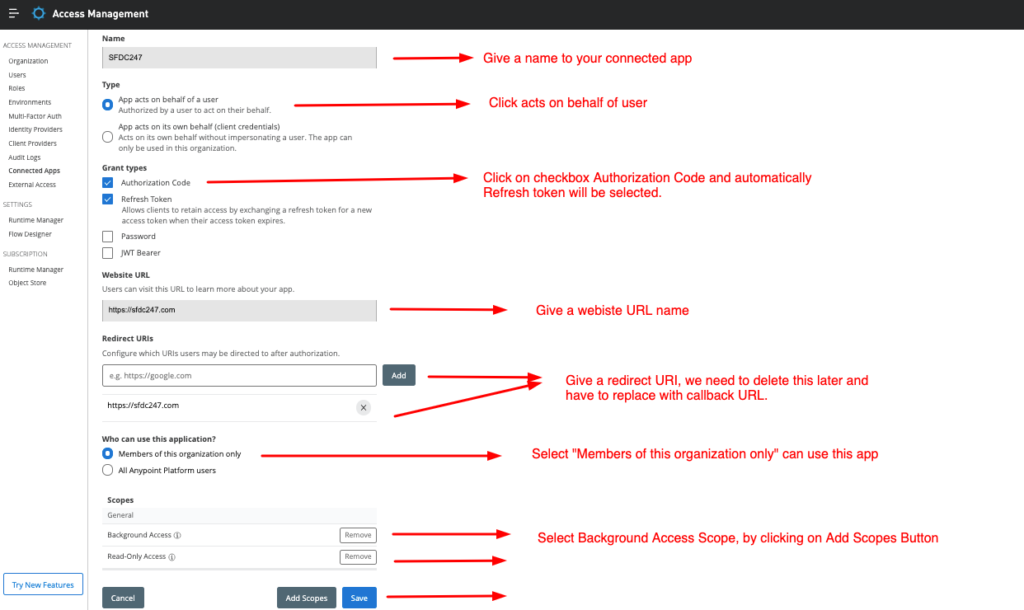
3. Create A Connected App In Mulesoft: In order to create a connected app in mulesoft you have to fill all the details as per the screenshot mentioned below.
4. Copy Client ID And Client Secret: Once the
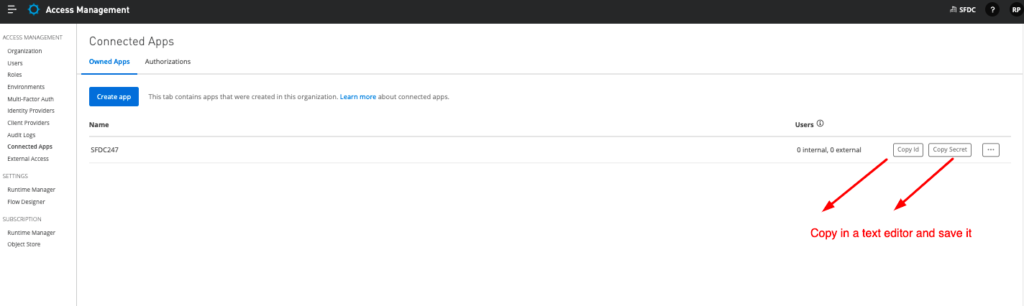
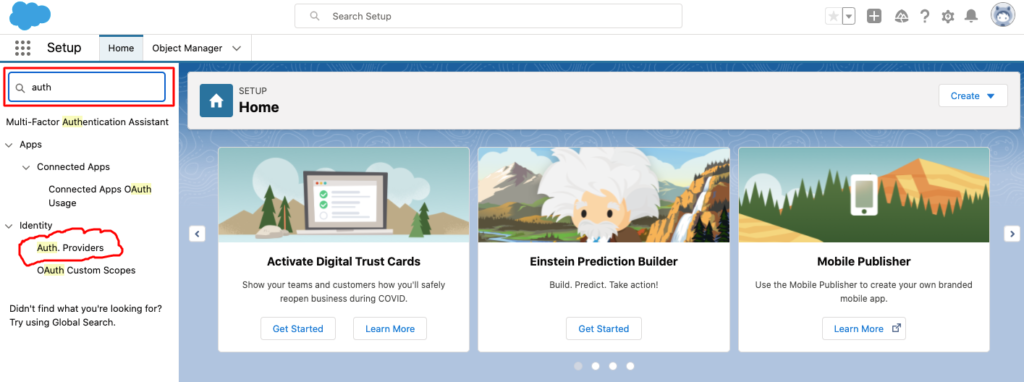
5. Login to salesforce instance and search for Auth provider: Once you have logged in go to Setup | QuickFind | Auth | Auth Providers | Click on New | Select Open ID Connect
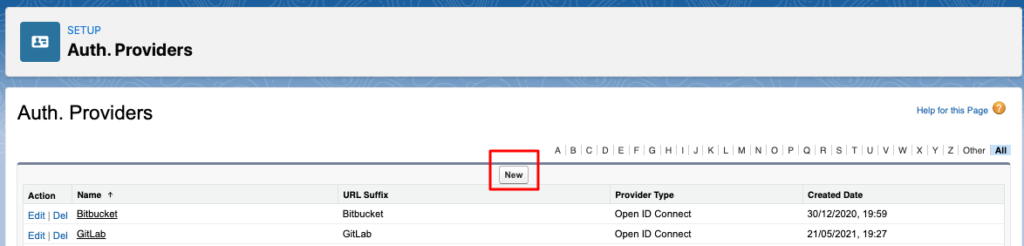
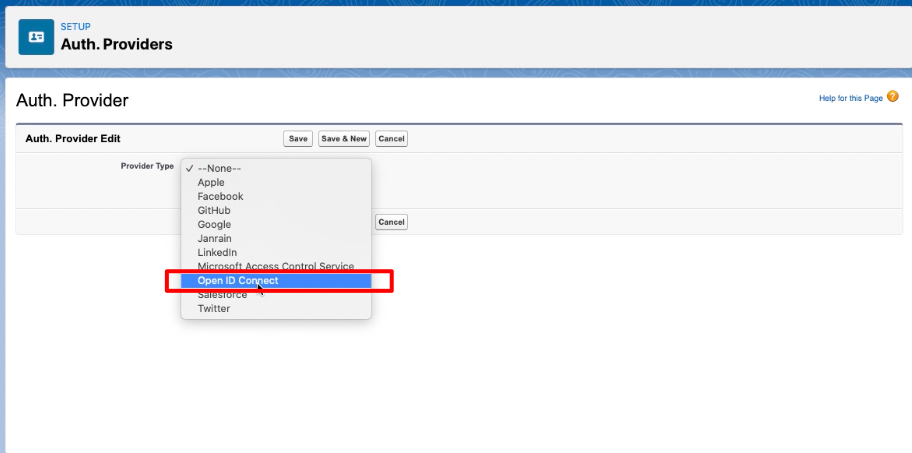
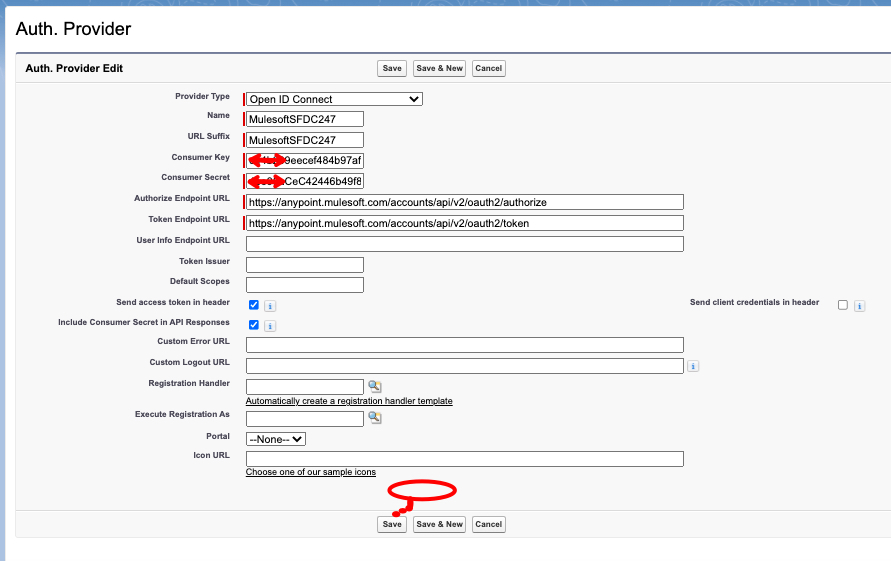
6. Create Open Id Connect Auth Provider Type In Salesforce: As per the above image, when you click on Auth Providers there will be a list of providers available for you to connect but you have choose openId connect and then fill the details as per the table below:
| Details Needs To Be Filled | Value Information For Open Id Connect |
| Provider Type | Open ID Connect |
| Name | Give Your Auth Name |
| URL Suffix | Give Your Auth Suffix Name |
| Consumer Key | Copy the client id from the MuleSoft Connected App |
| Consumer Secret | Copy the consumer secret from the MuleSoft Connected App |
| Authorize Endpoint URL | https://anypoint.mulesoft.com/accounts/api/v2/oauth2/authorize |
| Token Endpoint URL | https://anypoint.mulesoft.com/accounts/api/v2/oauth2/token |
| Send access token in header | Checked |
| Include Consumer Secret in API Responses | Checked |
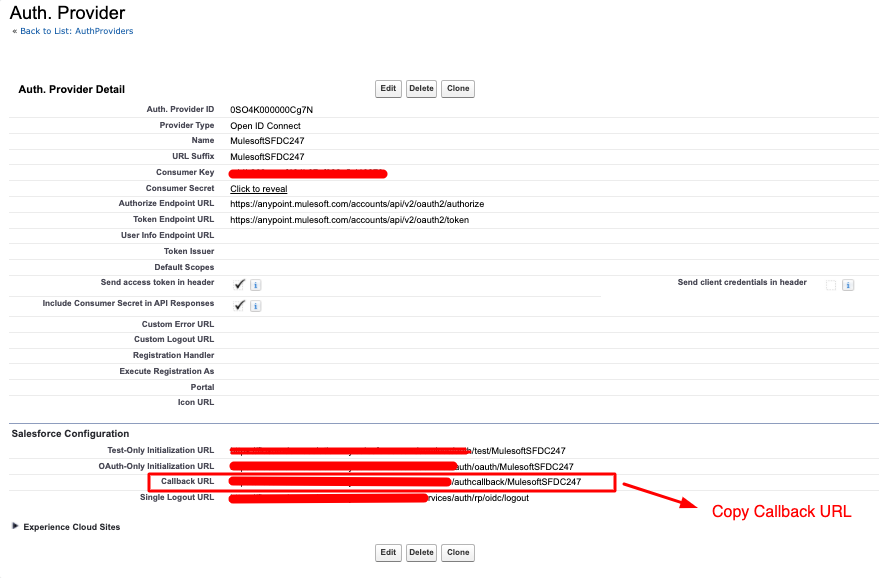
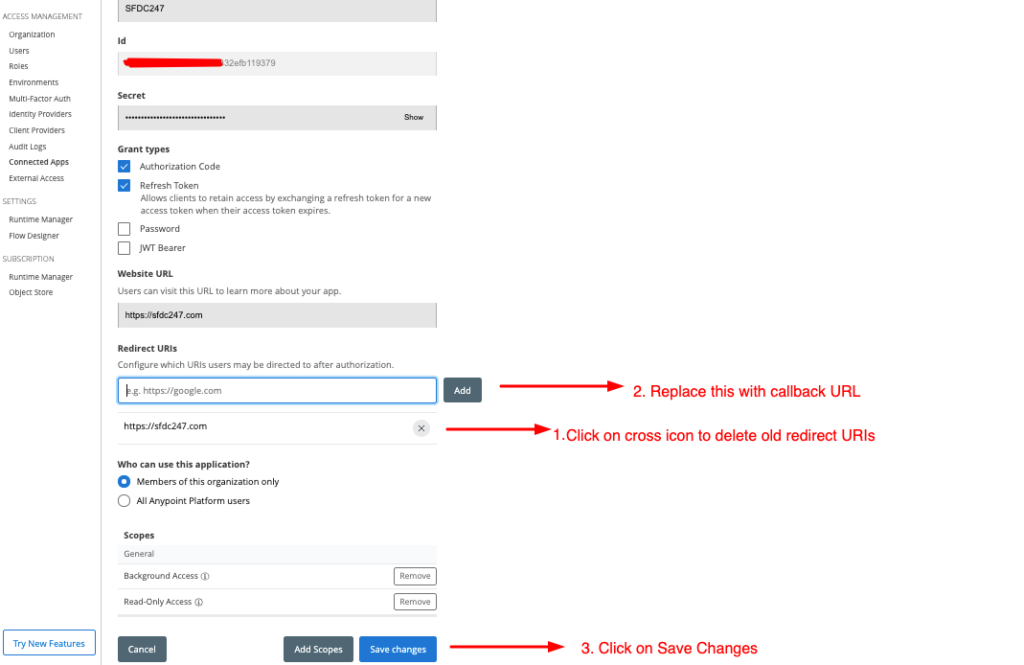
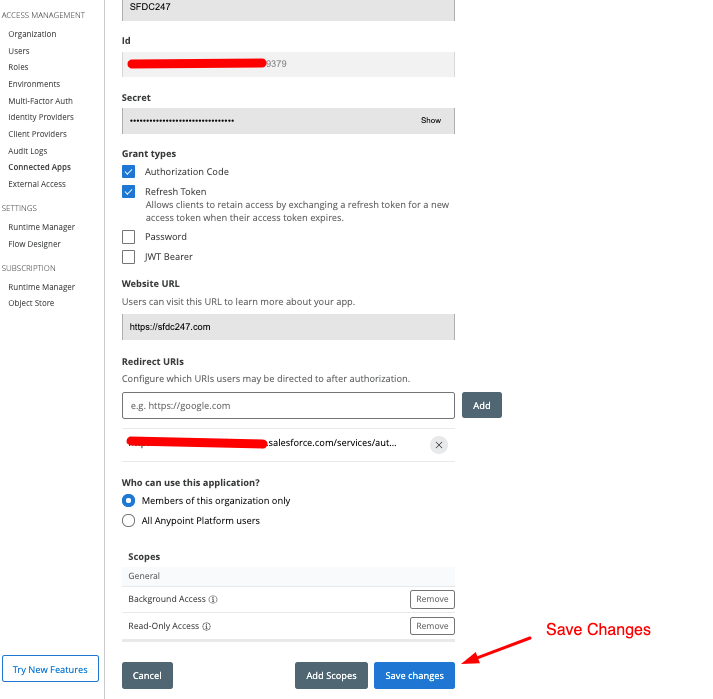
7. Update Callback URL on Mulesoft Connected App: Login to you mulesoft anypoint studio and go to the connected app we have created earlier and delete the old redirect URL with the new callback URL generated above.
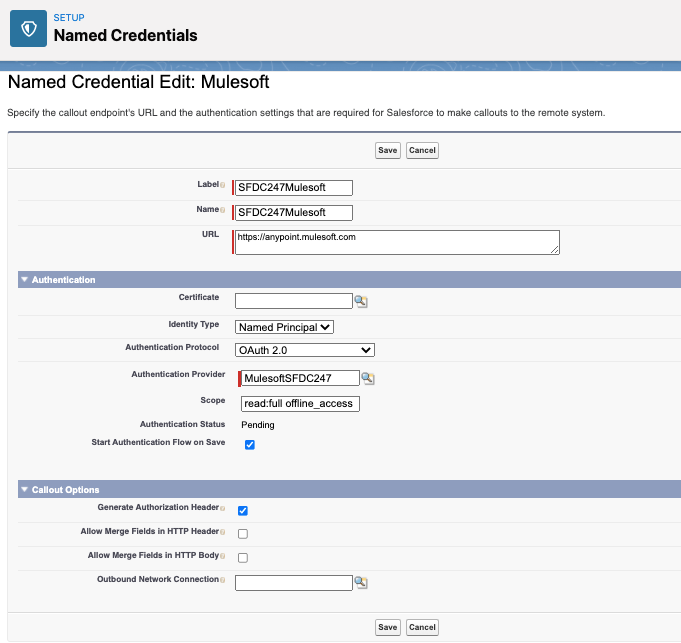
8. Create a Named Credential: This will help us to make a callout to mulesoft application. In order to create a salesforce named credential go to Setup | Quick Find | Named Credentials | Click on Enter Named credentials button | Fill the details mentioned below and save.
| Named Credential Settings | Values |
| Label and Name | Any suitable Label and Name. We have to use in Apex/Flow |
| URL | https://anypoint.mulesoft.com |
| Identity Type | Named Principal |
| Authentication Protocol | OAuth 2.0 |
| Authentication Provider | Choose OpenId Auth Provider Created |
| Scope | read:full offline_access |
| Generate Authorization Header | true |
As you can see in the below screenshot I have filled all the above details to create a new Named Credential. Once you click on save, you will be redirected to AnyPoint Platform.
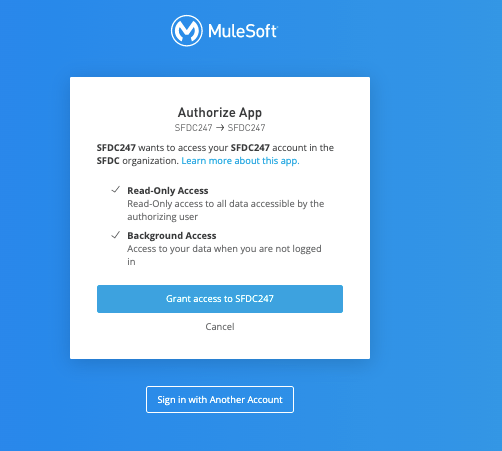
As you can see below, I need to Authorize App to grant Access to SFDC247. Please note that you have to be in session or you have to login manually to authorize access.
On the below screenshot you can see that our org was Authenticated.
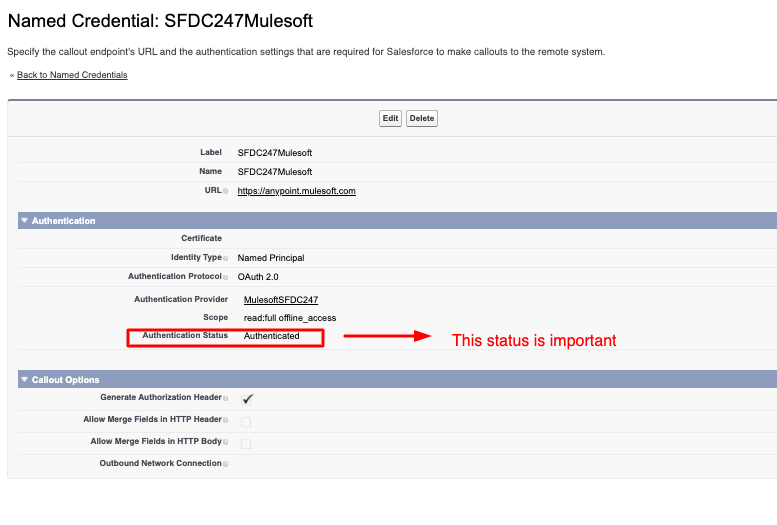
Congratulations, you have successfully authenticated your Salesforce with Anypoint studio platform using Auth Provider and Named credential features of salesforce. Now we are on the final stage of our integration.
How To Import Mulesoft AnyPoint Studio API Using Salesforce External Service For Mulesoft
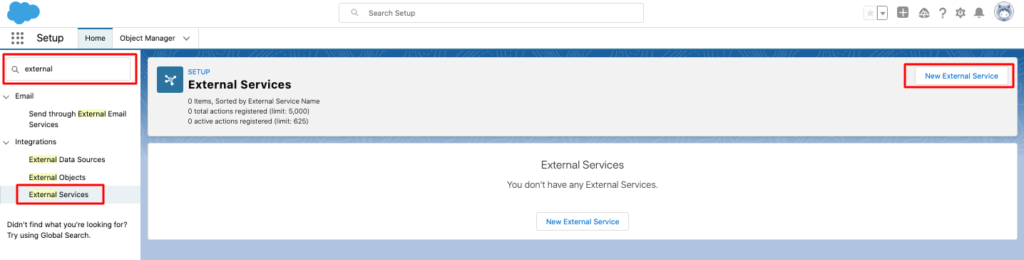
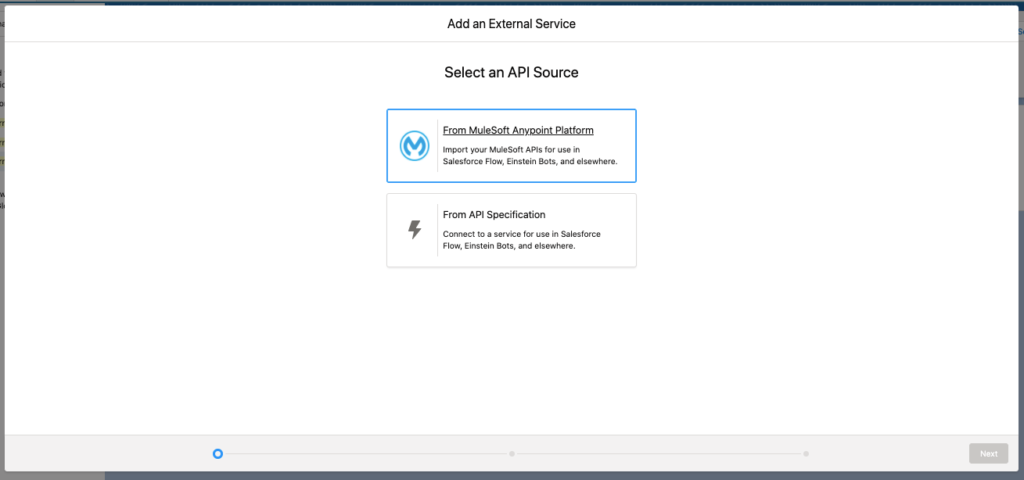
Salesforce external service for Mulesoft is a new feature of winter 22 release and if you are not able to see this option on your salesforce org, I would recommend you to create a case with salesforce. In order to access to feature login to your salesforce account and then go to Setup | QuickFind | External Service | Click on “New External Service” (also added a screenshot for your reference)
Select an API Source | click on “From Mulesoft Anypoint Platform” | Click on Next (added a screenshot for your reference)
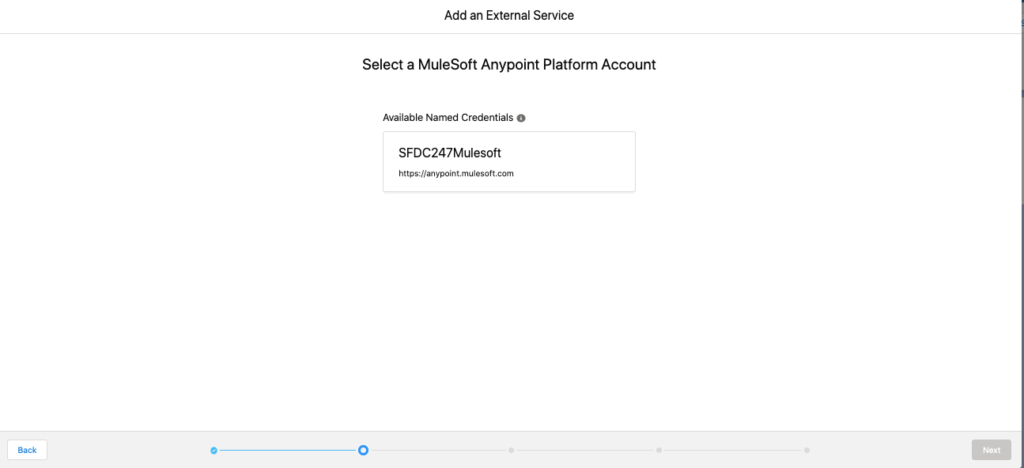
Automatically it will populate your named credentials, select your Available Named Credentials. As shown in the below screenshot I have selected SFDC247Mulesoft, which we have created above.
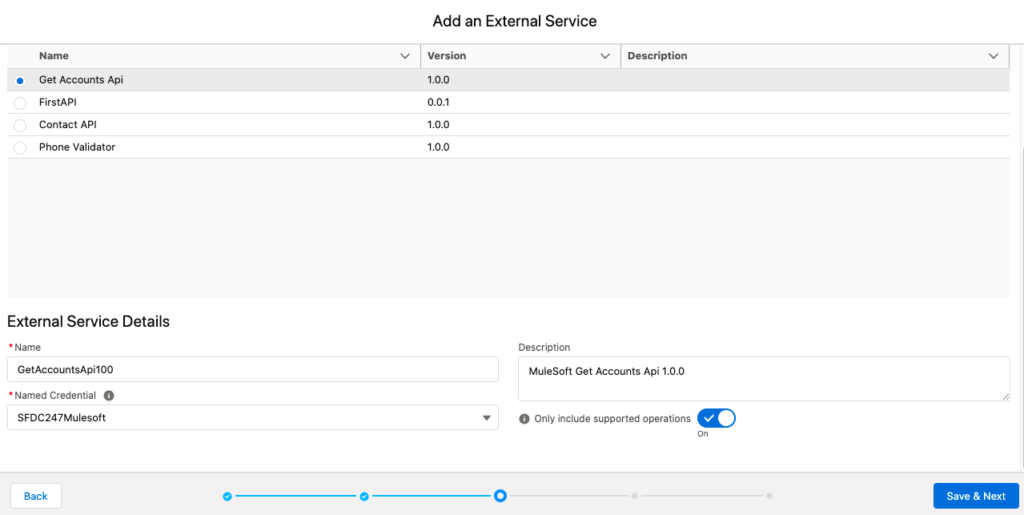
Then you have to select the API which will be imported automatically from your anyPoint studio platform. So, as you can see below, we have created an API “Get Accounts Api” and its populated automatically. So, I have clicked on the radio button and then you have to provide external service details.
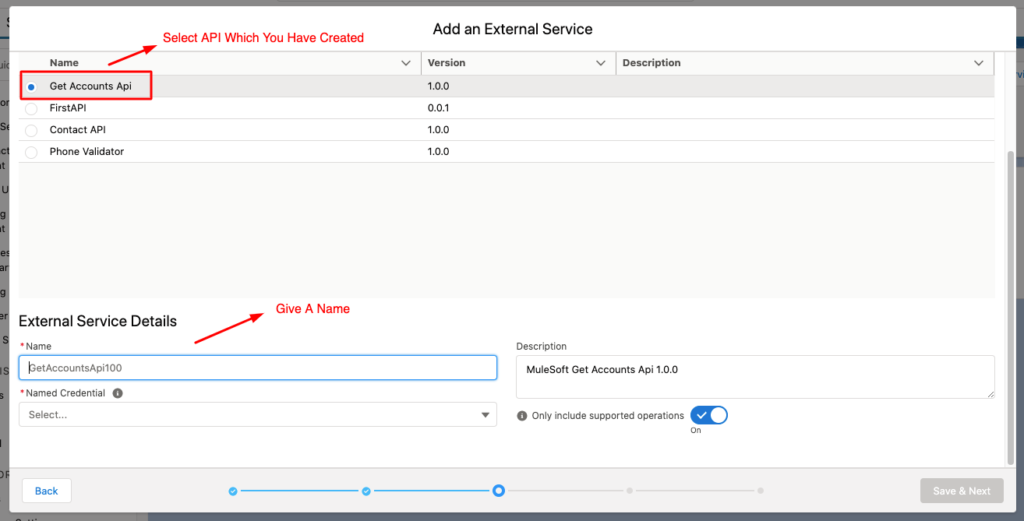
So, in this case I have provided below deatils:
| Name | GetAccountsApi100 |
| Named Credential | Choose your selected Named Credential For Mulesoft |
| Description | Give a user friendly description |
Once the above details are filled you have to click on Save & Next
Select the API Endpoint resource and then click on Next
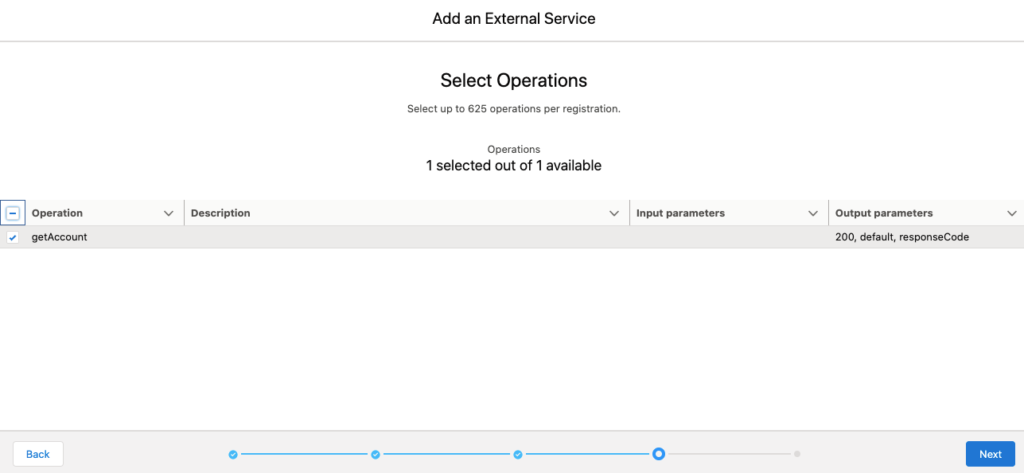
Finally, you will see the schema of your API with the output parameters and click on Done
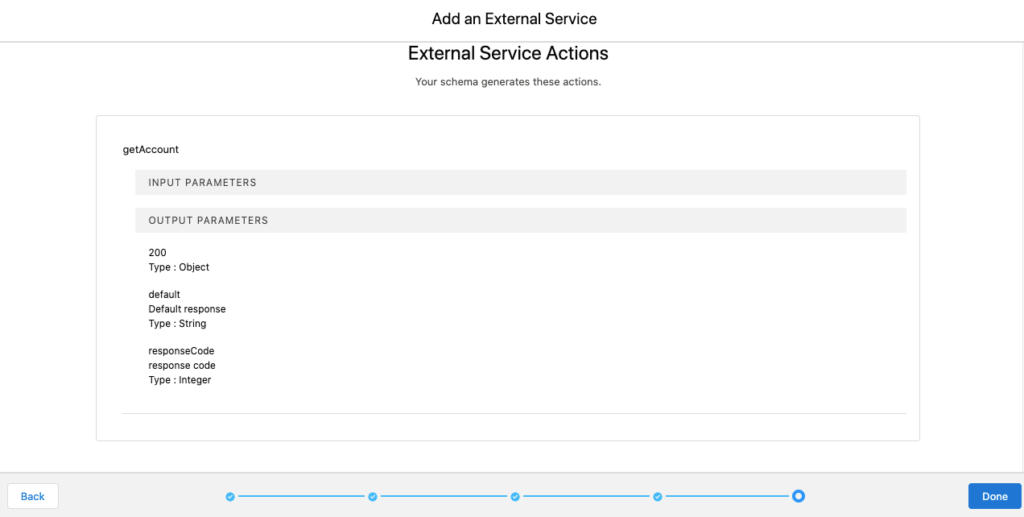
On the below screenshot you can see that you have successfully imported GetAccountsApi which we have created above.

Thus, you are now able to import Mulesoft API into salesforce and you can use it in Flows/ExternalServiceCalls. I am really sorry for lot of images that I have added but, i wanted to make a detailed article on How to create your first Mulesoft API using AnyPoint Platform and retrieve those API’s using salesforce external service.
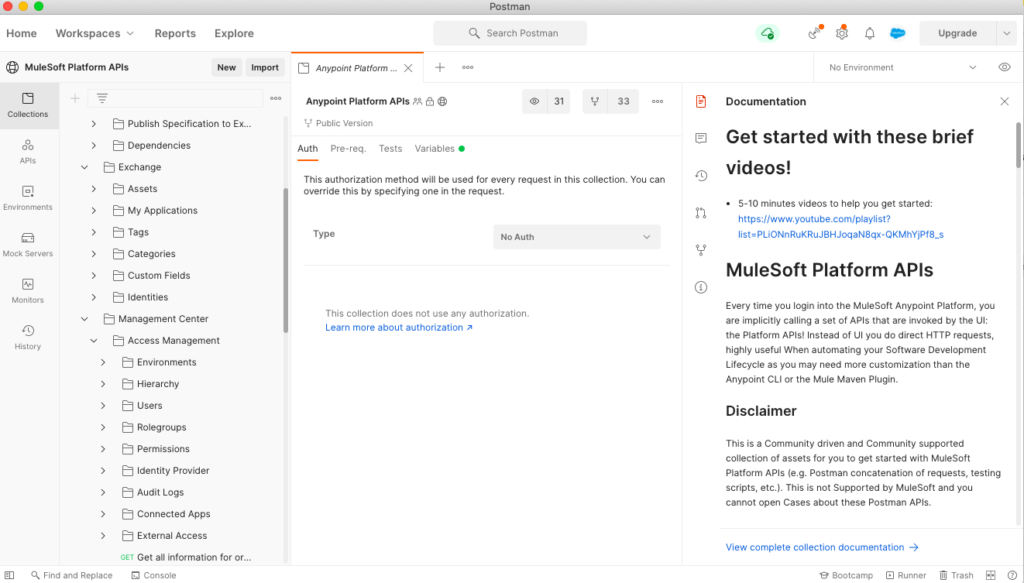
If you want to build or test any Mulesoft API, you can also use the Mulesoft Postman Collection. I have added a screenshot for your reference.
Also Read: https://sfdc247.com/2021/09/quick-guide-salesforce-metadata-coverage-report.html
After reading this post you would be having many questions and I would love to hear it from you and your team. Shoot any questions that you would like to discuss with me and we can find the best practice for retrieving metadata components in your project.You can always comment, contact me on LinkedIn and I will reply back you immediately
#Note: Publishing this content anywhere without consent of SFDC247 will result in lawsuit against copyright infringement
Hi,
When the named credential has a URL set to https://www.anypoint.mulesoft.com, the error thrown in a flow that references the external service is 301 Moved Permanently. However, when the URL in the named credential is set to the request URL of the actual api itself, the error thrown is PKIX Path building failed – no valid certificate found. Curious what the solution there is?
Hi Frank,
The first step is to set up Debug Logs and then find out the root cause of the issue.
Please look at this article:https://salesforce.stackexchange.com/questions/374593/import-mulesoft-apis-with-external-services-301-moved-permanently-response
I hope this is helpful.
Regards,
SFDC247
Hi ,
The contents were in details. Thank you. It would be really helpful if you can show to test it out using postman. Thanks