I’ve outlined my Git DevOps strategy for Salesforce development, but I need your insights! Managing version control and deployments in Salesforce can be challenging, even with tools like sfdx-git-delta and automated pipelines. While my strategy includes branch management, static code analysis, and rollback mechanisms, I’m curious if there’s anything I’ve overlooked. How do you handle deployment conflicts? Are there tools or practices you use to streamline collaboration and automate processes that I could incorporate? Your feedback could help refine this approach and create a more efficient workflow. Read through my strategy, share your expertise, and let’s collaborate to make Salesforce development smoother and more reliable for everyone!
You can also read : https://sfdc247.com/2020/06/flosum-vs-autorabit-vs-copado-the-best-salesforce-devops-release-management-tool.html
Here is the Table of Contents for your reference
- Introduction
- Prerequisites
- Step 1: Baseline Setup for Master Branch
- Step 2: Development Workflow
- Step 3: Static Code Analysis & Security Scans
- Step 4: Create a Pull Request (PR) and Review Process
- Step 5: Deploy Changes Using YAML Pipeline
- Step 6: Rollback Deployment Automation
- Step 7: Release Management & Merging Strategies
- Git Branching and Deployment Process
- Git Process Summary Table
- Conclusion
Note: In this guide, I’ve used SFDX commands, even though Salesforce has officially moved to SF commands. While SFDX is technically deprecated, it still works, and many Salesforce developers (including me) continue to use it in their workflows. If you’re transitioning to SF commands, you can easily map them using my tool: SF Commands Tool ”
Introduction
This guide provides a step-by-step Git version control process tailored for Salesforce development workflows. It details retrieving metadata, committing changes, deploying via YAML pipelines, and managing rollbacks effectively. Whether you’re starting from scratch or optimizing your current workflow, this guide ensures streamlined collaboration, efficient deployments, and reliable version control.
Prerequisites
✅ Repository creation – A Git repository has been created and linked to a remote host (e.g., GitHub, GitLab, Bitbucket, or Azure Repos).
✅ Salesforce Org setup – Your Salesforce org (Production, Sandbox, or Scratch Org) has been configured, and you have the necessary authentication credentials.
✅ Salesforce CLI (SFDX) installed – You have Salesforce CLI installed and properly set up on your system.
✅ Development environment – You are using VS Code with the Salesforce Extension Pack or another IDE suitable for Salesforce development.
✅ Branching strategy defined – Your team has established a Git branching strategy (e.g., feature branches, hotfix branches, and release branches).
With these prerequisites in place, you can now focus on implementing an efficient Git DevOps process for Salesforce development, ensuring version control, CI/CD automation, and streamlined deployments.
Step 1: Baseline Setup for Master Branch (You decide whether you want SFDX or Source Metadata format)
Why Do We Need This?
The baseline setup for the master branch is the foundation of any Git-based Salesforce workflow. It ensures that your master branch reflects the production environment’s current state. By having a clean, reliable baseline, you prevent conflicts and discrepancies when multiple team members work on features simultaneously. Additionally, protecting the master branch ensures that all changes are validated, reviewed, and tested before merging, maintaining production stability.
How to Do It?
1. Retrieve Metadata from Production
Start by connecting to your production Salesforce org and retrieving all metadata. This ensures you have the most up-to-date configuration and customizations. Use the following commands:
Retrieve the Full Metadata from Production:
Authenticate to the production Salesforce org: sfdx auth:web:login -r https://login.salesforce.com
Retrieve all metadata from production and generate package.xml:: sfdx force:mdapi:retrieve -u -r ./metadata –apiversion=57.0
Unzip the retrieved metadata: unzip ./metadata/unpackaged.zip -d ./metadata
Convert metadata to the source format for SFDX: sfdx force:mdapi:convert -r ./metadata
2. Initialize a Git Repository
Create a Git repository if one doesn’t already exist. Add the retrieved metadata as the initial commit:
Initialize a Git repository (if not already done): git init
Add all retrieved metadata files:git add .
Commit the changes:git commit -m "Initial baseline commit from production"
3. Push to Master Branch
Push your baseline setup to the master branch of your remote repository:
git remote add origin <repository-url>
git branch -M master
git push -u origin master
4. Set Up Branch Protection
Protect the master branch to prevent direct commits. This ensures that changes can only be made via pull requests, maintaining the integrity of the branch.
GitHub – https://docs.github.com/en/repositories/configuring-branches-and-merges-in-your-repository/managing-protected-branches/managing-a-branch-protection-rule
Azure – https://learn.microsoft.com/en-us/azure/devops/repos/git/branch-permissions?view=azure-devops
BitBucket – https://support.atlassian.com/bitbucket-cloud/docs/use-branch-permissions/
GitLab – https://docs.gitlab.com/ee/user/project/repository/branches/protected.html
Step 2: Development Workflow
Why Do We Need This?
A structured development workflow minimizes conflicts and ensures all changes are tracked, reviewed, and deployed efficiently. Pulling the latest changes from the repository and the Salesforce org ensures developers always work with the most up-to-date code and configurations.
How to Do It?
1. Pull Latest Changes
Always begin by pulling the latest updates from the repository to avoid overwriting others’ work:
Pull the latest master: git pull origin master
Let us assume that we are working on a Jira ALM Solution and Jira ticket has been created eg. JIRA-123 for implementing a new feature. Based on the Jira ticket, we follow a structured branch naming convention.
2. Create a New Feature Branch
Your feature branch should follow a naming convention like feature/JIRA-123-description: git checkout -b feature/JIRA-123-description
This ensures that your development is tracked against the Jira ticket.
Step 2: Retrieve the Latest Metadata from Salesforce (If Applicable)
I am assuing that you are working on a Salesforce project that uses Salesforce DX (SFDX) or Metadata API, retrieve the latest metadata:
For Salesforce DX (SFDX) Projects:
1. Authorize your Dev/Sandbox Org (if not already authenticated): sfdx auth:web:login -a MyDevOrg
2. Pull the latest metadata from your scratch org/Sandbox: sfdx force:source:pull
3. Make Changes Based on the User Story: Modify your Apex classes, Lightning Web Components (LWC), Triggers, Validation Rules, or Configuration settings as per the Jira story 123.
4.Deploy Changes to Your Sandbox or Dev Org for Testing: Once development is complete, deploy changes back to Salesforce for validation: sfdx force:source:push / sfdx force:mdapi:deploy -d deploy_folder -u MyDevOrg -w 10
5. Validate Your Changes Locally: sfdx force:apex:test:run -u MyDevOrg -r human -w 10
6. Commit Your Changes to Git (Including Merge Considerations):
Once your feature branch is up to date with master, you can commit your changes.
6.1: Add and Commit Your Changes:
git add .
git commit -m “JIRA-123: Implemented feature XYZ”
git status
6.2: Ensure Your Branch is Up to Date with master
Before pushing, check if master has been updated by other developers.
You have two options: Rebase (Preferred) or Merge or CherryPick
6.3: Push Your Changes
After rebase: git push origin feature/JIRA-123-description –force-with-lease
After merge: git push origin feature/JIRA-123-description
When to Use Rebase vs. Merge vs. Cherry-Pick
| Scenario | Use Rebase (git rebase) |
Use Merge (git merge) |
Use Cherry-Pick (git cherry-pick) |
|---|---|---|---|
| Keeping a Clean Commit History (Linear history) | ✅ Yes (Preferred) | ❌ No (Creates merge commits) | ❌ No |
Pulling Latest Changes from master into a Feature Branch |
✅ Yes | ✅ Yes | ❌ No |
| Combining Commits Before Pushing (Squashing) | ✅ Yes | ❌ No | ❌ No |
| Avoiding Unnecessary Merge Commits | ✅ Yes | ❌ No | ❌ No |
| When Working Alone on a Feature Branch | ✅ Yes | ❌ No | ❌ No |
| When Conflicts are Likely and Need to be Resolved Together | ❌ No | ✅ Yes | ❌ No |
| Preserving the Original Commit History | ❌ No (Rewrites history) | ✅ Yes (Keeps history) | ✅ Yes (Picks specific commits) |
| Collaborating in a Shared Feature Branch | ❌ No (Can cause history rewrite issues) | ✅ Yes | ❌ No |
Merging a Completed Feature Branch into master |
❌ No | ✅ Yes | ❌ No |
| Applying a Specific Commit from One Branch to Another | ❌ No | ❌ No | ✅ Yes |
Fixing a Bug in master and Backporting to Another Branch |
❌ No | ❌ No | ✅ Yes |
Avoiding Force Push (git push --force) |
❌ No (Requires force push after rebase) | ✅ Yes | ✅ Yes |
| If the Feature Branch is Already Pushed to Remote | ❌ No (Rewriting history can cause issues) | ✅ Yes | ✅ Yes |
Final Summary of Development Workflow
1️⃣ git checkout -b feature/JIRA-123-description (Create feature branch)
2️⃣ git fetch origin && git rebase origin/master (Ensure branch is up to date)
3️⃣ Make your Salesforce changes (Apex, LWC, Metadata)
4️⃣ git add . && git commit -m “JIRA-123: Implemented feature”
5️⃣ git push origin feature/JIRA-123-description –force-with-lease (Push safely)
Step 3: Static Code Analysis & Security Scans
Why Do We Need This?
Static code analysis helps maintain code quality and security. Tools like SonarQube and PMD detect vulnerabilities and ensure your code adheres to best practices, minimizing bugs and security risks before deployment.
How to Do It?
1. Automate Analysis
I would recommed setting up a CI/CD pipeline locally and also setup automatically run static code analysis on every commit to your repository. Use tools like:
• SonarQube for code quality and security
• PMD for detecting common coding issues in Apex
• CheckMarx for comprehensive security scans
• Salesforce Code Analyzer for analyze your code.
Want to make your Salesforce DevOps workflow even smoother? I built a tool to help you easily recognize and use Salesforce CLI commands. Check it out here: SF Commands Tool
What I usually do so that no one blames my code is not good, Before pushing my changes, I run these tools locally to detect issues:
SonarQube (for code quality & security analysis): sonar-scanner -Dsonar.projectKey=YourProjectKey -Dsonar.sources=src -Dsonar.host.url=http://localhost:9000
PMD (for Apex code quality checks): pmd-bin/bin/run.sh pmd -d force-app/main/default/classes -R rulesets/apex/quickstart.xml -f text
CheckMarx (for security vulnerability scanning): cx scan –project-name “Salesforce-Project” –source-location ./src
Salesforce Code Analyzer (CLI ):sf scanner run –format xml –target “somefile.js”
2: Address Issues & Fix Vulnerabilities
• If SonarQube, PMD, CheckMarx report, Salesforce Code Analyzer report critical vulnerabilities, resolve them before proceeding.
• Re-run the scan after making fixes.
3: Automate Static Code Analysis in CI/CD
• Integrate SonarQube, PMD, and CheckMarx into your CI/CD pipeline to automate this step for every commit and run it specially during the merge of QA or UAT Branch.
Step 4: Create a Pull Request (PR) and Review Process
Once your code has passed static code analysis & security scans, it’s time to create a Pull Request (PR) for peer review.
4.1: Open a Pull Request (PR)
Navigate to your Git repository on GitHub/GitLab/Bitbucket/Azure DevOps and follow these steps:
1️⃣ Go to Your Repository
• Open GitHub/GitLab/Bitbucket/Azure DevOps in your browser.
• Navigate to the repository where your branch is located.
2️⃣ Select the Feature Branch
• Click on the Branches tab.
• Find your branch (e.g., feature/JIRA-123-description).
• Click on it to view your latest commits.
3️⃣ Click “New Pull Request” (PR)
• Look for the New Pull Request button and click it.
• Select your feature branch (feature/JIRA-123-description) as the source branch.
• Select the target branch (e.g., develop or team-branch).
4️⃣ Add PR Details
• Title: Keep it clear and descriptive (e.g., JIRA-123: Implemented feature XYZ).
• Description: Provide a short summary of the changes, linking to the Jira ticket.
• Example:
JIRA-123: Implemented Feature XYZPassed all static code analysis and security scans (SonarQube, PMD, CheckMarx)
Added new Apex class
AccountHelper.clsUpdated LWC
AccountList.jsto support new functionalityFixed PMD warnings & security issues
5️⃣ Assign Reviewers & Labels
• Select reviewers (team members responsible for reviewing your code).
• Add labels (e.g., feature, bugfix, needs-review).
• Set the PR as “Draft” if it’s not ready for final review.
6️⃣ Submit the Pull Request
• Click the Create PR button to submit it.
• Notify your team in Slack/Teams if required.
6.2: Code Review & Feedback
Once the PR is created, reviewers will evaluate the code.
✅ What Reviewers Check:
• Code quality, logic, and best practices.
• Security vulnerabilities or performance issues.
• Consistency with coding standards (PMD, SonarQube, ESLint).
• Proper documentation, test coverage, and formatting.
Feedback Process:
• Reviewers may add comments/suggestions in the PR.
Step 5: Deploy Changes Using YAML Pipeline and take Backup from previous revision
Why Do We Need This?
After merging the Pull Request, the next step is to deploy the changes using a YAML pipeline while ensuring we take a backup of the previous revision before deployment.
YAML pipelines enable automated, consistent deployments across environments. They can save time and reduce human error.
How to Do It?
5.1: Configure YAML Pipelines
Define separate YAML files for production, QA, and development environments. Include parameters for testing and deployment logic.
5.2: Perform Delta Deployments
Deploy only modified components using sfdx-git-delta to optimize deployments.
Define YAML Pipeline Configuration:
To manage different environments (Production, QA, Feature Validation), create separate YAML files for each:
YAML File Purpose
| YAML File | Purpose |
|---|---|
Deployment-prod.yml | Deploy changes to Production |
Deployment-qa.yml | Deploy changes to QA |
Validation-feature.yml | Validate feature branch metadata without deploying |
Validationonly-feature.yml | Validate metadata for syntax and test coverage only |
5.2: Configure Parameters & Deployment Logic
Your YAML pipeline should support backup, validation, and deployment logic with configurable Boolean flags.
Example YAML Pipeline Structure
parameters:
  - name: backup_revision_range
    type: string
    default: "HEAD~1..HEAD"

  - name: validate_c1
    type: boolean
    default: false

  - name: deploy_c1
    type: boolean
    default: false

  - name: test_level
    type: string
    default: "RunSpecifiedTests"

jobs:
  - job: BackupPreviousRevision
    displayName: "Backup Previous Metadata"
    steps:
      - script: |
          echo "Backing up previous metadata from revision $(backup_revision_range)"
          mkdir backup
          git diff --name-only $(backup_revision_range) | xargs cp --parents -t backup/
      - task: ArchiveFiles@2
        inputs:
          rootFolderOrFile: "backup"
          includeRootFolder: false
          archiveType: "zip"
          archiveFile: "$(Build.ArtifactStagingDirectory)/backup.zip"
          replaceExistingArchive: true

  - job: ValidateDeployment
    condition: eq('${{ parameters.validate_c1 }}', true)
    displayName: "Validate Salesforce Deployment"
    steps:
      - script: |
          echo "Validating Metadata for Deployment..."
          sfdx force:source:deploy -u $(OrgAlias) -p force-app -l $(test_level) --dry-run
        continueOnError: true

  - job: DeployChanges
    condition: eq('${{ parameters.deploy_c1 }}', true)
    dependsOn: ValidateDeployment
    displayName: "Deploy Changes to Salesforce"
    steps:
      - script: |
          echo "Deploying Metadata..."
          sfdx force:source:deploy -u $(OrgAlias) -p force-app -l $(test_level)
5.3: Deployment Strategy
1️⃣ Backup Previous Metadata Revision
• Before deploying, extract the metadata from the last commit.
• Store it in a ZIP file for rollback.
• This is handled in the BackupPreviousRevision job.
2️⃣ Validate Metadata Before Deployment
• The pipeline validates metadata changes before pushing to Salesforce.
• Uses sfdx force:source:deploy in dry-run mode (–dry-run flag).
• If validation passes, proceeds to deployment.
3️⃣ Deploy Changes to the Target Org
• If validation is successful and deploy_c1 is true, deploys metadata to Salesforce.
4️⃣ Use Quick Deployment (If Applicable)
• If the validation job returns a job_id, use Quick Deployment:
sfdx force:source:deploy -u <OrgAlias> -q <job_id>
5.4: UI-Based YAML Pipeline Enhancements
If you’re using Azure DevOps / GitHub Actions, the UI allows:
• Selecting revision counters to determine previous versions.
• Choosing Salesforce Org dynamically based on environment variables.
• Viewing deployment logs and validation results directly.
Summary of Deployment Workflow
1️⃣ Backup metadata from previous revision (stores as ZIP).
2️⃣ Run validation-only deployment (ensure metadata compiles).
3️⃣ Proceed with full deployment if validation passes.
4️⃣ Use Quick Deployment if metadata is pre-validated.
5️⃣ Enable UI-based revision & org selection for flexibility.
Step 6: Rollback Deployment Automation in YAML Pipeline & Git Revert using CLI / GUI
Why Do We Need This?
Rollback processes mitigate the risk of deployment failures. They provide a quick way to revert to the last known working state.
If the deployment fails, the Git repository should be reverted to its last stable state.
How to Revert the Last Commit (Single Commit Rollback)
If only one commit caused the issue, use: git revert HEAD
This creates a new commit that undoes the last commit without losing history.
How to Revert Multiple Commits
If multiple commits are affected, use: git revert HEAD~2..HEAD
This reverts the last two commits while keeping history.
How to Completely Reset to a Previous Stable Commit
If you need to erase all changes after a specific commit:
git reset –hard
git push origin –force
This completely removes all commits after <commit-hash>, restoring the repo.
If you prefer not to use Git CLI for reverting code, you can restore deleted files directly from the UI of Git platforms such as Azure, GitHub, Bitbucket, and GitLab.
Summary of Recovery Options
| Method | Steps |
|---|---|
| Git CLI (Latest Commit) | git checkout HEAD -- path/to/deleted-file |
| Git CLI (Specific Commit) |
Find the commit where the file was last available: git log -- path/to/deleted-file Restore the file: git checkout <commit-hash> -- path/to/deleted-file
|
| GitHub UI |
Navigate to Commits > Find the commit > Click “View file” > Copy contents and restore manually OR use the Revert option to restore the file. |
| GitLab UI |
Navigate to Commits > Find the commit > Click “View file” > Copy contents and restore manually OR use the Revert option to automatically restore the file. |
| Azure DevOps UI | Go to Repos > Commits > View Changes > Find the deleted file > Copy its content and restore manually. |
| Bitbucket UI |
Go to Commits > Find the commit > Click “View file” > Copy contents and restore manually OR use the Revert option to restore deleted files. |
How to Revert Code from Backup (Based on YAML Pipeline Configuration)
Since the YAML pipeline already includes a backup step before deployment, you can use the stored backup file (backup.zip) for reverting to the last stable metadata version in Salesforce.
Step 6.1: Locate the Backup File
The YAML pipeline automatically:
• Creates a backup before deploying (backup.zip stored in $(Build.ArtifactStagingDirectory)).
• Uses Git diff to track changes (HEAD~1..HEAD revision).
• Stores previous metadata before deployment.
To manually retrieve the backup, you can: ls -lh $(Build.ArtifactStagingDirectory)/backup.zip
This confirms that the backup exists.
Step 6.2: Restore the Backup Manually
If rollback is required outside the pipeline, follow these steps:
Option 1: Restore Locally and Re-Deploy
1. Extract the backup: unzip $(Build.ArtifactStagingDirectory)/backup.zip -d restored-metadata
2. Deploy the previous metadata to Salesforce: sfdx force:source:deploy -u -p restored-metadata -l NoTestRun
6.3. Verify the deployment in Salesforce Setup → Deployment Status.
Option 2: Trigger Rollback from YAML Pipeline
If the deployment fails, the pipeline automatically restores the previous metadata:
  - job: RollbackDeployment
    condition: and(eq('${{ parameters.rollback_on_failure }}', true), failed())
    displayName: "Rollback to Previous Metadata Version"
    dependsOn: DeployChanges
    steps:
      - script: |
          echo "Restoring previous metadata from backup..."
          unzip $(Build.ArtifactStagingDirectory)/backup.zip -d force-app
          sfdx force:source:deploy -u $(OrgAlias) -p force-app -l NoTestRun
This ensures metadata is reverted to its previous version if deployment fails and the rollback is automatic when rollback_on_failure = true.
To ensure the team is notified whenever a Deployment / Rollback is triggered in the YAML pipeline, you can integrate Slack notifications and Email alerts.
Step 7: Release Management & Merging Strategies
This step explains how to manage feature branch releases and merge strategies for deploying to QA, UAT, and Production environments. Additionally, we explain how to use tools like KDiff / Beyond Compare / Meld to resolve merge conflicts and demonstrate how the flow in the provided Git Process Flow can be executed using merge, rebase, and cherry-pick.
Why We Need This Step
In scenarios where:
• Changes have already been merged into QA, and you are working on a Full Copy Sandbox for further testing and deployment.
• You cannot rely on Git platform features (e.g., pull requests, peer reviews) for resolving conflicts.
• Merge conflicts need to be resolved directly in your local repository or during deployment preparation.
This step provides a workflow to:
1. Manage merges efficiently using Git Merge, Rebase, or Cherry-Pick.
2. Resolve conflicts using tools like KDiff for a seamless deployment pipeline.
3. Ensure changes are successfully deployed to QA, UAT, and Production with minimal reliance on peer reviews.
Merging Strategies:I have already provided the table scenarios for the merge strategies above; below, I will only share the usage.
When managing releases, choose a merging strategy based on your workflow requirements and you can use Git Merge, Git Rebase and Git Cherry-Pick and to Resolving Merge Conflicts you can use KDiff / Beyond Compare / Meld. You can configure them locally to resolve merge conflicts.
Resolving Merge Conflicts Using KDiff
Merge conflicts can occur during the merge, rebase, or cherry-pick process. Here’s how to resolve conflicts with KDiff:
Step 1: Configure KDiff as the Default Merge Tool
1. Set KDiff as the merge tool:
git config –global merge.tool kdiff3
git config –global mergetool.kdiff3.path “/path/to/kdiff3”
2. Confirm the configuration: git config –get merge.tool
Step 2: Assuming that you perform a Git merge when merging changes from the SIT branch to the UAT branch as part of the release processTrigger the Merge and Resolve Conflicts
1. Perform a merge:
git checkout UAT
git merge SIT
Resolve Merge Conflicts: git mergetool (Kdiff as we configured above)
git add <conflicted-file>
git commit -m “Merged SIT into UAT and resolved conflicts”
git push origin UAT
I have provided a standard Git process flow and its working methodology.
You can also read – https://sfdc247.com/2020/03/salesforce-release-management-and-version-control-branching-strategy.html
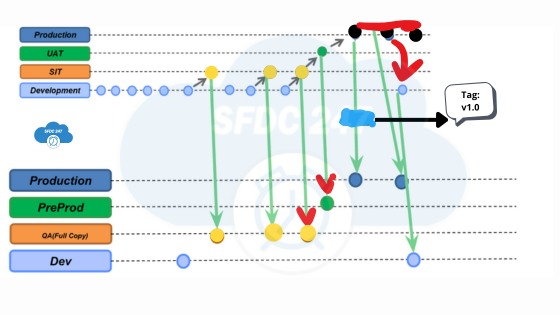
Git Branching and Deployment Process
• Each org has its own dedicated branch:
• Dev Sandbox → dev branch
• QA (Full Copy) → qa branch
• Pre-Prod → pre-prod branch
• Development Workflow:
• Developers work on their assigned user stories and commit changes to their local repository daily.
• Code is pushed to the dev branch, where validation runs against the Dev Sandbox.
• Once validated, changes from the dev branch are merged into the QA (qa) branch, tested, and deployed to the QA Sandbox.
• Pre-Prod & Production Deployments:
• The pre-prod branch is merged with Pre-Prod and deployed using YAML pipelines.
• Production deployments are manually triggered.
• Hotfix Process:
• If post-production issues arise, a new sandbox is created from Production (Hotfix Sandbox).
• A new Hotfix branch is created to address the issue, ensuring minimal impact on ongoing development.
Git Process Summary Table
| Step | Action | Example Command |
|---|---|---|
| Daily Commits | Developer commits locally | git commit -m "Implemented feature" |
| Push to Dev | Push feature branch to dev | git push origin feature/my-new-feature |
| Merge to SIT | Merge dev changes to SIT branch | git checkout SIT && git merge feature/my-new-feature |
| Deploy to SIT Sandbox | Validate and deploy | sfdx force:source:deploy -p force-app -u SITOrgAlias |
| Deploy to UAT (YAML) | Trigger deployment via YAML | sfdx force:source:deploy -p force-app -u UATOrgAlias (inside YAML pipeline) |
| Production Deployment | Manual deployment | sfdx force:source:deploy -p force-app -u ProductionOrgAlias |
| Hotfix Management | Create and deploy hotfix branch | git checkout -b hotfix/prod-issue-fix && sfdx force:source:deploy -p force-app -u ProdSupport |
| Post-Production Fix with Cherry-Pick | Cherry-pick specific commits to branch | git checkout release && git cherry-pick <commit-hash> |
Conclusion:
Alright, we’ve walked through a complete Git DevOps strategy for Salesforce—from setting up a solid master branch to handling deployments, rollbacks, and hotfixes. The goal? Make version control and deployments smoother, more efficient, and less stressful.
This approach helps with:
✅ Keeping a clean and structured Git workflow so your org doesn’t turn into chaos.
✅ Ensuring every change goes through proper reviews before merging.
✅ Running static code analysis so we don’t push broken or insecure code.
✅ Automating deployments with YAML pipelines to save time and reduce errors.
✅ Having a solid rollback plan in case things go wrong.
That being said—is this the perfect process? Probably not! Every team has different needs, and things can always be improved. Maybe you have a better way to handle merge conflicts? Or a smarter way to automate testing? I’d love to hear how you do it.
What Do You Think? Let’s Improve Together!
What works well in your Git process?
What’s the biggest headache in your Salesforce deployments?
Any tricks or tools you swear by that I should include?
Drop your thoughts in the comments, and let’s make this workflow even better!
You can also read – https://sfdc247.com/2025/02/how-to-find-the-last-refresh-date-of-a-salesforce-sandbox-step-by-step-guide.html
If you have any questions regarding Salesforce DevOps, I can guide you and clear all your doubts. you can always comment and contact me from our contact us page we will try to answer your queries as soon as possible and in case you have any suggestion on how to improve my website page, do reach out to me.
We also write product reviews on the tools and if you have any product that you would like to get reviewed you can always comment, contact me via Contact Us Page and I will reply back you immediately
#Note: Publishing this content anywhere without the consent of SFDC247 will result in a lawsuit against copyright infringement